
I'm pretty excited to share this blog post with you today - this is a super fun DIY project brought to us by another one of my fabulous inters - Lynlee!! So take a look and leave her some love! Take it away Lynlee!
So since we are in the middle of fall, I decided that it would be so fun to be able to make a fun little decorative wreath. Lately I have been obsessed with all things burlap, so that is what I chose to make it out of. I spotted this idea on Pintrest (of course) and just had to make it.

{ M A T E R I A L S }
- Foam wreath
- 3 strips of burlap (4 inches x 70 inches)
- Embroidery thread (I chose brown, but you can pick whichever you want)
- Needle
- Hot glue gun
- straight pins
{ S T E P 1 }
- Cut 3 strips of burlap (4 in. x 70 in.)

{ S T E P 2 } Using straight pins, secure the ends of one strip of burlap and wrap the foam circle. Continue to use straight pins as needed to hole the burlap in place.

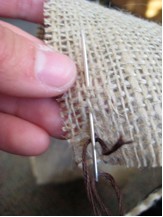
{ S T E P 3 } Take the next strip of burlap, using a needle and embroidery threat, stitch loosely along the side of it.
{ S T E P 4 } Next, take the ruffled burlap and attach it to the backside of the foam.

{ S T E P 5 } After you have done this, use hot glue to make sure that it is secure.

{ S T E P 6 } Repeat step 3 with the last piece of burlap.
{ S T E P 7 }With this strip, place it on the front side of the foam, using straight pins (use minimal hot glue to make sure it is secure)

And voila—you have your wreath!!

Once you have your wreath, you can spice it up for any occasion - we added some cute fall Tatters for this one, but you can change it up with just about anything! Happy Monday friends!


0 comments:
Post a Comment